Reading a token
Open a token card to read its price, route, risk badges, and chart before you trade.
The token card is the heart of Alkanex. It is a single panel that tells you what a token costs, how deep its liquidity is, how the bot would route a trade, and whether the token is risky to enter or hard to get out of. You read the card first, then you trade from it.
Open a card
There are two ways to pull up a card:
- Paste an AlkaneId. Send a token id in
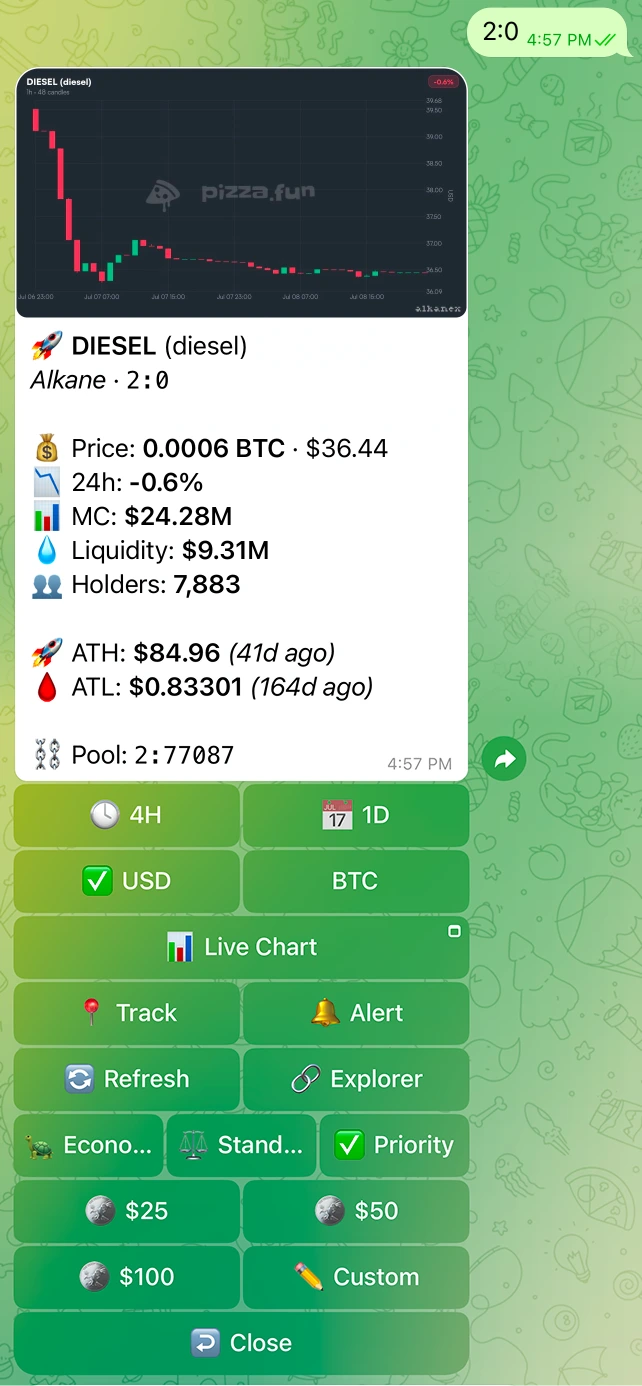
block:txform (for example2:0) into the chat at any time. The bot replies with that token's live market card. - Open one from your portfolio. Tap any position row in your Portfolio to open the live card for a token you already hold.
You do not need a command. Pasting an id works from anywhere in the bot.
Every field on the card
The card aggregates live data from the indexer (price, pool, holders, candles) into one view. Fields appear when the data is available; a token with no pool shows only what can be known.
| Field | Label on card | What it means |
|---|---|---|
| Price | Price | The token's current price, in your display unit (USD or BTC). Sub-dollar prices show extra significant figures, so a small token reads $0.0018058, not $0.002. |
| 24h change | 24h | Price move over the last 24 hours. |
| Market cap | MC | Price times circulating supply. |
| Liquidity | Liquidity | How deep the trading pool is. Thin liquidity means more slippage. |
| Holders | Holders | Number of addresses holding the token. |
| Pool | Pool | The AMM pool id the token trades against. |
| Route | Route | How the bot would reach frBTC: a direct pool or a multi-hop path (see below). |
| Price impact | Price impact | How much your trade itself would move the price, at the probed size. This is pure slippage, separate from the fee. |
| Total fee | Total fee | The combined swap fee along the route. |
Route: direct vs multi-hop
Most tokens trade directly against frBTC. Some do not, and for those the bot finds a path through other pools.
- Direct pool. The card shows
Route . Direct pool. One swap, lowest cost. - Multi-hop. The card shows a
Multi-hopbadge and a hop count:1 hop,2 hops, and so on. The bot ranks candidate paths by the amount you actually receive, not simply the fewest hops, with a tie-break toward the deepest liquidity.
The route the card shows is the route the bot would sign. A multi-hop path with a high hop count can be slower and costlier, and very long paths may not be tradeable at all (see the no-route badge below).
Risk badges
The card surfaces risk in plain language so you are not surprised after you trade. These badges are computed from live liquidity and route data.
| Badge | Bot wording | What to do |
|---|---|---|
| Low liquidity | "Low liquidity" · "Thin pool, high slippage risk." | The pool is thin. Expect more slippage. Trade smaller. |
| Hard to exit | "Hard to exit" · "Selling back would cost {pct} in price impact. Hard to exit." | You could get in cheaply but pay a lot to get out. Size your entry accordingly. |
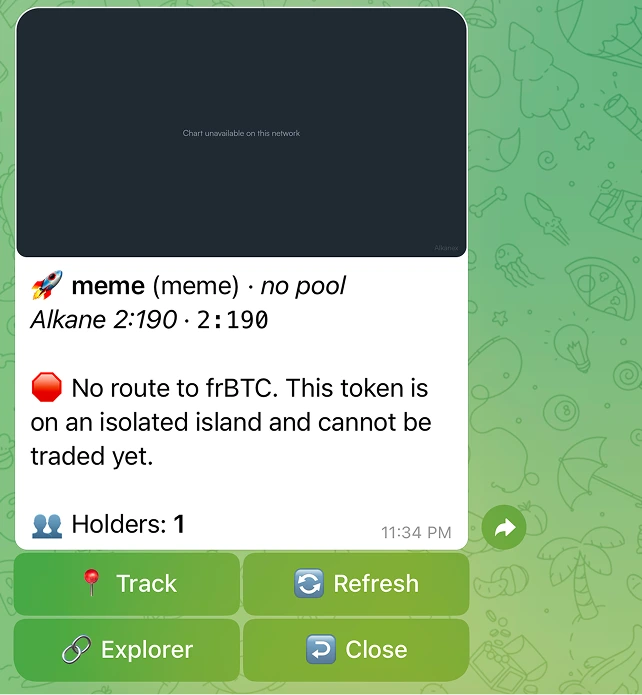
| No pool | "No AMM pool yet. Token is not tradeable here." (badge: "no pool") | The token has no trading pool. You cannot trade it in the bot yet. |
| No route | "No route to frBTC. This token is on an isolated island and cannot be traded yet." | There is a pool, but no path back to frBTC. Not tradeable yet. |
| Cannot sell back | "No route to sell this token back to frBTC." | There is a way in but no way out via frBTC. Treat as one-way. |
When you do go to trade, the bot also re-checks these risks and interposes a hard confirmation before it signs: when the price impact exceeds your slippage setting, when a buy cannot be sold back, or when the trade is large. The card badge is the early warning; the trade confirmation is the safety net.
Chart, timeframes, and history
The card carries a candle chart image rendered for the token, plus a couple of history markers.
- Timeframe. Switch the chart's window from the card. The chart redraws in place.
- ATH / ATL. All-time high and all-time low, with how long ago each happened ("today", "3d ago").
- Refreshed. The card notes how fresh the data is ("Refreshed just now", "Refreshed 2m ago").
Card buttons
These are the controls on a discovery (pasted) card.
| Button | What it does | Status |
|---|---|---|
| Track | Pins a live, auto-updating card for the token so you can watch it without re-pasting. | Live |
| Alert | Price alerts. Tapping it shows "Alerts coming soon." and does nothing else for now. | Coming soon |
| Refresh | Re-fetches live price, liquidity, and chart and redraws the card. | Live |
| Explorer | Opens the token on a block explorer. | Live |
| Live Chart | Opens a full TradingView-style chart (pizza.fun) inside Telegram's built-in webview. | Live |
| Close | Dismisses the card. | Live |
If you already hold the token
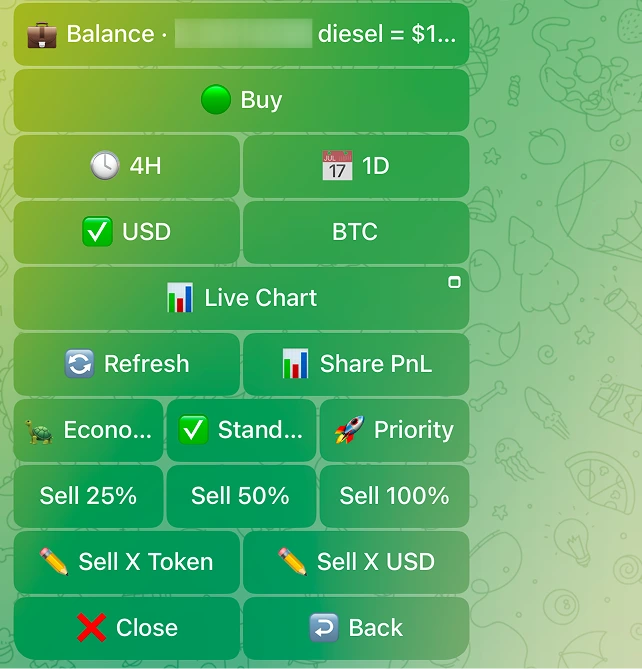
When you hold the token, a Sell button appears on the card. It opens your position, where you sell by 25% / 50% / 100% or a custom amount. Selling is covered on the Selling page.
Buying from the card
There is no plain "Buy" button on the discovery card. You buy from the amount presets ($25 / $50 / $100, plus Custom), covered in detail on the Buying page.
There is deliberately no separate "frBTC Buy" button. The amount presets are the one buy entry. When the frBTC you already hold covers the amount, the buy spends it directly, with no wrapping step and no wrap premium. When it does not, the buy wraps BTC for you as part of the same flow. You never choose between BTC and frBTC.
What you cannot do here yet
| Action | Status | Where it lives instead |
|---|---|---|
| Set a price alert from the card | Coming soon | Not available yet |